Access Location, Camera & Mic of any Device via StormBreaker
- KevinsinghJ
- Feb 15
- 4 min read
In this article, i’d be explaining how we can be able to achieve as stated in the title above using a tool called Storm Breaker.
To begin, go over to their GitHub’s repo (link below)

As you can see, I'm already accessing their github repo and I'll copy the link.
Next i’ll go to my terminal, navigate to the opt directory, that’s where I like to install optional programs (hence the opt)

And then i’ll download the tool by simply typing git clone followed by the link we copied from github

Once downloaded, we can run command ls ( to see all the files and directory listed under /opt ) and see that Storm-Breaker is listed there.
Then we can change directory to Storm-Breaker by running command cd Storm-Breaker/ and followed by command ls ( to see all the files and directory listed under /OPT/Storm-Breaker )

As you can see, we have an installation script that will install the tool for us. But before running it, we have to install a few required packages that the program uses.
We’ll do so by running command apt update ( to update the sources )

Followed by the command apt install python3-requests python3-colorama python3-psutil ( to install the required packages ) and click enter ( a prompt whether I’d like to continue) to confirm that I want to install all the packages.

Once it completes, run command ls (assuming you didn’t change the directory and still on directory /opt/Storm-Breaker)
Followed by command bash install.sh (we’re using bash because it’s a shell script and this is how you run it on linux)

After running the command, a prompt will be shown whether you would like to continue, click Enter. Some time will be taken for the installation to be completed.

After completion, it shows you the error as above, at the end. Don’t worry as the program will still work.
Next step is to run command python3 st.py (we’re using python3 because the program is written in Python 3 and the main application file is st.py)

As you can see, it seems to be loaded up without any issue at all. It has given us the link to the admin panel which we’ll use to track people through their location (1).
It’s also telling us to (2) install a program called NGROK on Port 2525 in order to allow people to access the web panel link (because right now it’s only running on my own local computer which will only work within my own network). Therefore we’ll have to use the NGROK program in order to allow us to access the link outside of my network, which means any device or tool can access it anywhere in the world.
So I’ll go to below link to get NGROK installed
Once there, I chose the Linux installer as I'm going to be using it on my Linux machine. And then I’ll click Download to get it downloaded (1). Once the download is complete, I’ll have to copy the command (2) and run it on my terminal, this is to install NGROK on my linux machine.

Once on my terminal, i’ll right-click and choose Split Terminal Horizontally

Once it’s splitted, I'm going to paste the command that I copied.

And the command ran with no issue which means it got executed as expected. But before using NGROK, we need to create an account on the NGROK website. For that, visit https://ngrok.com/ and click on sign-up

Fill up your name, e-mail and password in order to sign-up successfully.

Once sign-up is done and you’re in, scroll down a little and copy the following command. This I’ll have to execute in my terminal, in order to link my machine’s operating system to the account I created in NGROK (that’d be done through the authentication token that’s populated in the command, the one which colored it in green, for security reason)
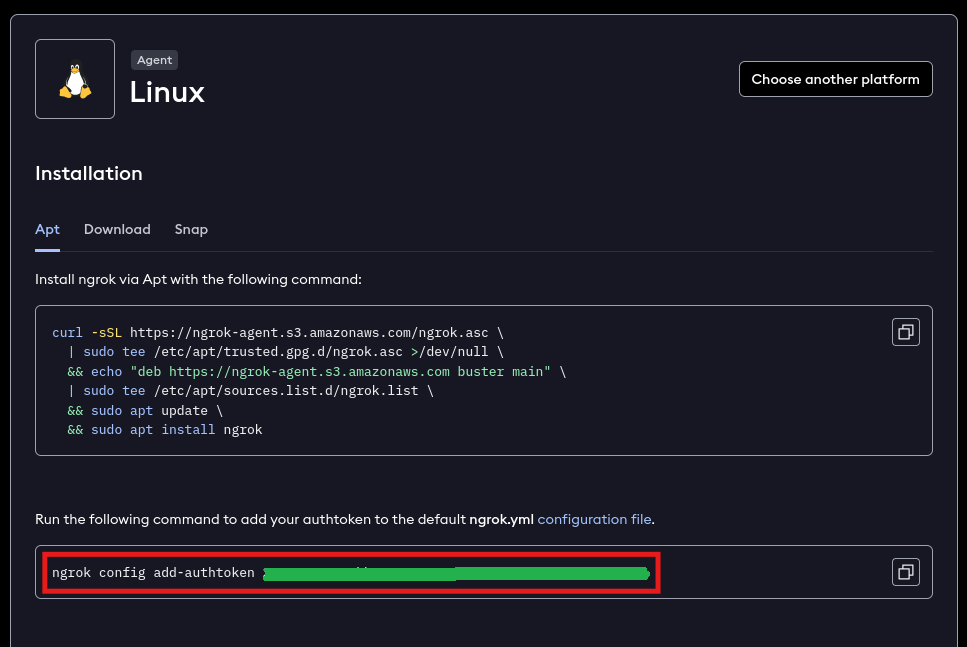

Perfect, the result is telling me that the authentication token is saved to that stated file. Which means my machine is linked to the account I created on NGROK's website. So now I can start using the NGROK tool on my computer.

As you can see, Storm Breaker is already telling me in order to use NGROK’s tool, i’d need to execute the command ngrok http 2525 which i’ll paste it in below terminal (please take note that there are 2 terminals here, because of me splitting it horizontally earlier, I divided it in red line as below, for some reason the divider is not obvious in my machine)

Once i run the command, it should look as per below

And then from my browser, i should visit http://localhost:4040/inspect/http and it should be shown as below, proceed to click on the shown link


Once it’s launched, login by keying-in admin for both username and password

So this is our admin control panel, where we’ll have all of the links (1) that we can share with the targets and we’ll also be able to get information that we want on the result box (2). Notice that those links will serve a different purpose (as i’ve underlined it in green). It’s for you to track the target's camera, microphone, weather etc.
The front part of the link http://64bd-161-142-148-64 might be suspicious for someone to click on it but there are many ways to get around it. Best way is to install this tool on a server, on the cloud and get it linked to a domain’s name which would be more convincing.
Moving on, i’ll click on below link through my windows laptop

Once i click on continue, notice that there’s a notification popping up asking me to set the permission. Let’s see what happens if i choose to allow it

On our admin control panel, my data will be shown

And when i visit the Google Map Link, almost an accurate location of mine will be visible

Moving on to another one of the links, perhaps we can try the one with camera access. So i’ll be going to below link through my windows laptop

So if i click on Allow, notice that on the admin control panel, i’ll get a notification on top right that an image file i saved.

Once i have it opened, it’s my image there.

There are 3 more links on the admin control panel that you can make use of.
That’s it from me for this article.